Categories
Linux Monitoring openSUSE

Installing New Relic Servers on openSUSE

New Relic Servers is an excellent cloud-based server monitoring platform. I maintain a set of servers, both physical and virtual, running a range of operating systems, namely: Debian 7/8, Ubuntu 14.04, CentOS 6/7 and openSUSE 13.2. I work with configuration management (particularly Salt), so maintaining multiple configurations is important in understanding complex environments.

New Relic already provides packages for Debian/Ubuntu, Red Hat, Joyent SmartOS and Windows. For some reason, openSUSE doesn’t get the royal treatment, but they do provide the requisite package files in a tar.gz archive for “Other Linux” systems, so let’s work with that.

Installation

  • Grab the latest release version of New Relic Servers, available from the page below:
    https://rpm.newrelic.com/accounts/<YOUR-NEWRELIC-ACCOUNT-ID>/servers/get_started

server#> wget https://download.newrelic.com/server_monitor/release/newrelic-sysmond-<VERSION>-linux.tar.gz

  • Decompress the downloaded archive.
server#> tar -zxf newrelic-sysmond-<VERSION>-linux.tar.gz
  • cd into the resulting directory.
server#> cd newrelic-sysmond-<VERSION>-linux
  • Important: Create the configuration and log directories.
server#> mkdir /etc/newrelic

server#> mkdir -m 750 /var/log/newrelic

  • Copy the example nrsysmond.cfg file to /etc/newrelic.
server#> cp nrsysmond.cfg /etc/newrelic
  • Edit the config file and enter your New Relic license key in the appropriate place, as below. No other changes should be necessary.
server#> vim /etc/newrelic/nrsysmond.cfg
[...]

license_key=<NEWRELIC-LICENSE-KEY>

[...]
  • Copy the daemon binary into somewhere that’s readily available on your path. /usr/local/sbin is a reliable choice.
server#> cp daemon/nrsysmond.x64 /usr/local/sbin/nrsysmond


Testing

Let’s go ahead and run nrsysmond. Remember to pass it the config file with the -c option.

server#> nrsysmond -c /etc/newrelic/nrsysmond.cfg

All going well, your openSUSE server will now be reporting to New Relic and you will be able to monitor it on your dashboard.


systemd service

No daemon is of any use without a decent init script or, in this case, a systemd service.

Disclaimer: I’ve only written a handful of systemd services, and they’ve all been pretty simple in nature. This is by no means a “good” service, but it seems to work fine as a means to manage New Relic Servers in a reliable fashion.

  • Create the systemd service file.
server#> vim /usr/lib/systemd/system/newrelic-sysmond.service
[Unit]
Description=Starts and stops the New Relic Server Monitor Daemon.
After=syslog.target network.target
[Service]
Type=forking
User=root
WorkingDirectory=/tmp
ExecStart=/usr/local/sbin/nrsysmond -c /etc/newrelic/nrsysmond.cfg
ExecStop=/usr/bin/pkill nrsysmond
Restart=on-failure
PIDFile=/var/run/nrsysmond.pid
[Install]
WantedBy=multi-user.target
  • Reload the systemd manager configuration.
server#> systemctl daemon-reload
  • Start the new systemd service.
server#> systemctl start newrelic-sysmond.service
  • If you want New Relic to start on system boot, you can enable the service.
server#> systemctl enable newrelic-sysmond.service


And that should be it! All going well, you now have a functional New Relic install on openSUSE with a working systemd service.
Categories
Linux

Scroll wheel functionality in GNU Screen

GNU Screen is one of my biggest time savers in work. It allows me to handle multiple shell and SSH sessions in one virtual terminal, and ensures those sessions stay alive even when I lose network connection due to switching access points, plugging in to a wired network or just general network issues, uh-ohs and whoopsies.

Screen works pretty well “out of the box”, as long as you learn a handful of essential commands/key bindings, like Ctrl+A+D (detach from session), screen -r session-name (re-attach to existing session) and Ctrl+A+numkey, where numkey represents a particular session.

By default, however, Screen does not work with your mouse scroll wheel (or touchpad two-finger scroll, etc.). Here is a little snippet you can add to your Screen config to enable this. The Screen config file is located in your home directory, at ~/.screenrc

termcapinfo xterm* ti@:te

After writing this to your .screenrc file, just launch a new session using screen -S session_name (or just screen if you’re not a fan of session names) and, voilà, you should now have scroll wheel functionality.

Note: There are some gotchas to this, mainly that the scrollback buffer seems to get shared across windows in a session, so you’ll often get the scroll buffer of another window “mixed in” with your current window.

Thanks to Pistos on Stack Overflow for this solution.

Categories
Buffalo LinkStation LS220 Linux

Completely recovering from a “bricked” Buffalo LinkStation LS200-series NAS (and opening the firmware too!)

I recently bought a Buffalo LinkStation LS220 NAS (network-attached storage) device. The device itself is a good quality piece of hardware, but the software leaves a lot to be desired. I bought this NAS purely as a redundant (i.e. RAID1) backup solution and intended to use it as an SSH server for my rsync backup scripts.

Much to my disappointment, however, the firmware came far more locked-down than I had hoped, and provided no means to (easily) enable SSH. In my struggles to find an elegant solution to this, I ended up “bricking” the device, meaning it would no longer boot. To make matters worse, I later found out that the LS220’s recovery features are stored on the disks’ /boot partition, which I had wiped while cleaning down the disks.

The information available online for unbricking and/or opening the firmware of the LS200-series is… sparse. I ended up having to contact Buffalo support in order to rectify everything. Thinking they’d tell me I’d voided my warranty and couldn’t help me as such, I was pleasantly surprised at how helpful they were in providing me TFTP Boot instructions, including all the relevant software and images required.

This post should act as a definitive guide to unbricking your LS200-series. I’ve even provided instructions on how to open up the firmware, enabling SSH, Telnet and more. Note that you will lose all data on your NAS, so perform any backups where possible.

This guide assumes you are running Linux and that your NAS is a LinkStation LS220.

Part 1: Wiping the drives

  1. Open up the front plate on your LS220 and remove both hard drives.
  2. Take a Phillips-head screwdriver and remove the screws on both hard drive mounting plates, so that the drives come away.
  3. Attach the hard drives to your computer. You can do this using a USB-SATA hard drive (3.5″) dock (I bought this one)
    …or, if you have spare SATA and power cables, just connect it directly to your computer’s motherboard.
  4. Open up a terminal and run GNU Parted on the block device representing the connected hard drive. Be careful during this part, as you don’t want to wipe your computer’s primary drive.
    In my case, the NAS drive shows up as /dev/sdb so I run Parted as follows:

    $> sudo parted /dev/sdb
  5. Using the parted print command, we can see that there are six partitions on the NAS drive by default:
    (parted) print
    Number  Start   End     Size ...
    1      17.4kB  1024MB  1024MB ...
    2      1024MB  6144MB  5119MB ...
    3      6144MB  6144MB  394kB ...
    4      6144MB  6144MB  512B ...
    5      6144MB  7168MB  1024MB ...
    6      7168MB  2992GB  2985GB ...
  6. Let’s go ahead and remove all of them:
    (parted) rm 1
    (parted) rm 2
    (parted) rm 3
    (parted) rm 4
    (parted) rm 5
    (parted) rm 6
  7. Great! You can now unplug this hard drive and repeat the above process for the other drive.
  8. Once both drives are done, screw the mounting plates back on to the hard drives and install them back into the NAS.

Part 2: TFTP Boot

This step involves flashing a minimal image to the drives, allowing it to boot into EM Mode. EM Mode allows us to get our final, fully-working firmware image on to the NAS.

Unfortunately, you’ll need a Windows PC for this part. I just ran a Windows 7 VM with a network interface bridged to my host’s eth0 interface.

  1. Connect your PC directly to your NAS with an Ethernet cable.
  2. Plug in and power on your NAS. After a few seconds, the LED on the front will flash red to let you know it failed to boot anything.
  3. The NAS will assign itself an IP address of 192.168.11.150/24. You will need to set Windows to a static IP of 192.168.11.1/24 in order to serve up the TFTP Boot image.
    To do this, open up Control Panel > Network and Sharing Center and click Change adapter settings.
    Right-click your network adapter and click Properties.
    Double-click Internet Protocol Version 4 (TCP/IPv4).
    Choose Use the following IP address and set the below values:

    IP address: 192.168.11.1
    Subnet mask: 255.255.255.0
    Default gateway: (leave blank)

    Then click OK and OK again to leave the Properties screen.

  4. Download the TFTP Boot server and images from the link below. I received these from Buffalo support and am hosting them here for convenience:
    TFTP Boot Recovery LS200
  5. Unzip the downloaded file and launch the TFTP Boot.exe program. The program should tell you its “listening On: 192.168.11.1:69”. If not, you have not configured your network adapter correctly.
    The bottom line should read “accepting requests” with a flashing cursor.
  6. Press the physical Function button on the back of your NAS until the LEDs start flashing white.
    The TFTP Boot window should now output two messages like below:

    Client 192.168.11.150 ... Blocks Served
    Client 192.168.11.150 ... Blocks Served
  7. Great! At this point, your NAS will be booting a minimal image and will boot itself into EM Mode. You can close the TFTP Boot program, as we are done with it now.

Part 3: Opening up the stock firmware image (SSH, Telnet, …)

  1. Download the NAS Navigator program from the link below. This should work in Linux under Wine/Crossover:
    NAS Navigator
  2. Unzip and install the program by running NasNaviInst.exe. Now run the NAS Navigator program.
  3. After a few seconds, your NAS should show up. Note that it is in Emergency mode and has an IP address in the range 169.254.0.0/16.
  4. Repeat the instructions from Part 2, Step 3 above, but this time set an IP address of 169.254.11.1 and a subnet mask of 255.255.0.0

    Very important
    :
    Note the subnet mask’s third number is a 0 (zero) and not 255.
  5. Download and unzip the latest firmware for your device from the Buffalo website below:
    http://www.buffalotech.com/support_and_downloads/downloads
  6. Download and unzip the linkstation-mod tools from GitHub below:
    linkstation-mod 

    You can also clone the repo if you’re comfortable using Git.

  7. Open up a terminal and browse to the linkstation-mod directory. Run the open-ls-rootfs.sh script on the hddrootfs.img file as below.

    Bonus – root login to NAS:
    Add your SSH public key to the “data” directory and rename it id_rsa.key. This will automatically install the key and grant you root access to the NAS.


    Very important: If you are not the root user, you must use sudo to execute the script due to some permissions requirements making /dev files. I spent hours trying to figure out why my LinkStation wouldn’t boot as a result of running this as a regular user.

    $> chmod +x ./scripts/open-ls-rootfs.sh
    $> sudo ./scripts/open-ls-rootfs.sh /path/to/firmware-directory/hddrootfs.img
  8. After the script has completed, you will see a new directory: “out“. Inside this directory is the (hacked/opened) hddrootfs.img file.
    You will need to change the permissions on this back to your regular user. For example, if your username is “aaron”:

    $> sudo chown aaron:aaron ./out/hddrootfs.img

    Copy this new hddrootfs.img file to the firmware directory, overwriting the old version.

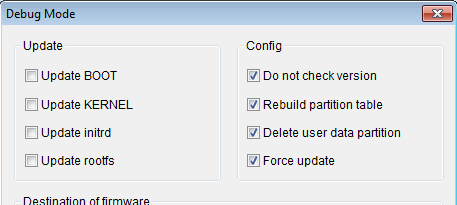
  9. Back in Windows (sorry), open up the firmware directory and open up the configuration file LSUpdater.ini. Add the following lines to the bottom to enable Debug Mode:
    [SpecialFlags]
    Debug = 1
  10. Run the LSUpdater.exe program. It should find your NAS. Click the window decoration in the top-left corner and click Debug(D)…Tick and untick the appropriate options until your configuration looks as below:debug_mode
  11. Click OK, then Update. You should now get a pop-up window saying “Formatting”, followed by “Transferring firmware”.

And that’s it! Your LinkStation LS200-series is now fully recovered and is now running an open firmware.


Categories
Android

Updating to Android 5.1.0/5.1.1 on rooted Nexus 5

Updated (2015-05-29) – I have tested this method successfully with Android 5.1.1 and have updated the post title/content to reflect this.

Does this post look familiar?
I wrote a post back in December 2014 solving this same problem for Android 5.0.1, whereby a rooted Nexus device will not update via over-the-air (OTA). Rather than go over everything again, I’ll cut straight to the chase of how to update your rooted Nexus 5 to Android 5.1.0/5.1.1 via fastboot.

This guide presumes you’re using either Linux or Mac, with the appropriate Android tools (adb and fastboot) installed, although the Windows method should be much the same. For the purposes of this example, I’ll assume this is the Android 5.1.0/5.1.1 update for Nexus 5 (hammerhead-lmy47d), but the instructions should be similar for future releases.

Note: This will not wipe your device. However, it is always a good idea to back up, as things can always go wrong.

First, download the appropriate Android factory image from the Google Developers site. Uncompress the archive, as well as the archive contained within it, as below:

$> tar -zxf hammerhead-lmy48b-factory-596bb9c1.tgz
$> cd hammerhead-lmy48b
$> unzip image-hammerhead-lmy48b.zip

Next, make sure your device is in fastboot mode (hold VolUp, VolDown and Power button from a powered-off device). Verify your device can be picked up by running fastboot devices, then run the following commands:

$> fastboot flash radio radio-hammerhead-m8974a-2.0.50.2.26.img
$> fastboot reboot-bootloader
$> fastboot flash recovery recovery.img
   (above recovery step is optional - will overwrite custom recovery)
$> fastboot flash boot boot.img
$> fastboot flash system system.img

If all goes well, your device will be flashed with the latest version of Android.

Bonus – re-root your device: grab the appropriate version of CF-Auto-Root for your device, extract it and run the correct root script contained within. Your device will need to be in fastboot mode for this to work.

Credit to /u/laxor09 on Reddit for much of this information.

Categories
Android

Updating to Android 5.0.1 on rooted Nexus 5

OTA (over-the-air) updating in rooted Nexus land has never been the most elegant process. But, prior to Android 5.0 Lollipop, at least it worked as expected, with the main irk being that you’d need to re-root your device afterwards.

While trying to update to Android 5.0.1 on my rooted Nexus 5 via OTA today, I discovered that things are now even less clear-cut and that the update itself will now fail during the recovery phase. Thankfully, there’s a (relatively) pain-free way of getting around this, providing your comfortable with fastboot at the command line.

This guide presumes you’re using either Linux or Mac, with the appropriate Android tools (adb and fastboot) installed, although the Windows method should be much the same. For the purposes of this example, I’ll assume this is the Android 5.0.1 update for Nexus 5 (hammerhead-lrx22c), but the instructions should be similar for future releases.

Note: This will not wipe your device. However, it is always a good idea to back up, as things can always go wrong.

First, download the appropriate Android factory image from the Google Developers site. Uncompress the archive, as well as the archive contained within it, as below:

$> tar -zxf hammerhead-lrx22c-factory-0f9eda1b.tgz
$> cd hammerhead-lrx22c
$> unzip image-hammerhead-lrx22c.zip

Next, make sure your device is in fastboot mode (hold VolUp, VolDown and Power button from a powered-off device). Verify your device can be picked up by running fastboot devices, then run the following commands:

$> fastboot flash radio radio-hammerhead-m8974a-2.0.50.2.22.img
$> fastboot reboot-bootloader
$> fastboot flash recovery recovery.img
$> fastboot flash boot boot.img
$> fastboot flash system system.img

If all goes well, your device will be flashed with the latest version of Android.

Bonus – re-root your device: grab the appropriate version of CF-Auto-Root for your device, extract it and run the correct root script contained within. Your device will need to be in fastboot mode for this to work.

Credit to /u/laxor09 on Reddit for much of this information.

Categories
Linux

Who’s trying to break in to your Linux box?

Fun with pipes! Just a quick Bash snippet for getting a good look at who’s attempting to log in to your Linux or other standard GNU system:

#shell> lastb -w | sort | awk '{print $1, "\t", $3}' | uniq | less

Here’s a quick summary of what’s going on here:

lastb reads and echoes the contents of the failed login database, generally located at /var/log/btmp. The -w flag just ensures it doesn’t ellipse or otherwise cut-off the username field.

sort very simply sorts the output of lastb alphabetically.

This awk snippet prints the 1st and 3rd columns of the sorted lastb output, which are username and source address respectively, separating them with a tab for ease of reading.

uniq gets rid of any duplicate entries, but only if they are on adjacent lines. This is another reason we used sort earlier.

Finally, less is just a decent file reader. Feel free to replace with output redirection to a file.

And the output. IP addresses randomised to defend the privacy of my attackers:

123456   89.101.45.51
123      89.101.45.51
1        63.200.120.14
2014     63.200.120.14
2015     63.200.120.14
2        63.200.120.14
aaa      63.200.120.14
aaron    63.200.120.14
aa       63.200.120.14
abc123   17.252.186.40
abc123   42.22.165.211
abc123   mail2.example.website.ru

…plus your typical number of root, admin, test, oracle and mysql attempts. Can’t quite explain the xxxxxxxxxxxxxxxxxx attempt though.

Categories
Development Linux Ubuntu Ubuntu SDK

uLuas – Developing a real-time Luas app for Ubuntu

uLuas logoOver the last few weeks I’ve been working on a project called uLuas. uLuas is an open source smartphone app developed using the Ubuntu SDK. It provides real-time tram stop information for Dublin’s Luas light rail service. In this post I’d like to talk about my reasons for developing this application and why I chose the Ubuntu platform.

First – and most importantly – I live and work in Dublin and commute daily using Luas. I rely on the Luas real-time passenger information (RTPI) system to provide me with information on stop times and, on unfortunate occasions, service stoppages. To consume this information, I use a number of end-user services, including the Luas website, Real Time Ireland Android app and, despite crashing on every second launch, the Luas Android app. While the backend data that these apps play with is impressive, I feel that they are presented pretty poorly, being essentially wrapped web apps with non-native and clunky interfaces.

I’ve been following the development of Ubuntu for Phones/Tablets (“Ubuntu Touch”) since its announcement just over a year ago. What excited me about it wasn’t necessarily the idea of having Ubuntu on my phone, but instead the consolidation (or “convergence”, as Canonical call it) of the code base, meaning a standardised platform to develop for. Up until this point, developing an app for Ubuntu meant relying on numerous external tools using Gtk+ bindings for drawing GUIs. The Ubuntu SDK, which was announced around the same time as Ubuntu Touch, is based around Qt Quick, which uses QML for GUI markup and JavaScript for programmatic elements. I skimmed through the documentation and followed the Currency Converter tutorial, then never did much more than that until late last year.

After the release of Ubuntu Touch 1.0, which was a release aimed at developers, I decided to flash it to my Nexus 7 and Samsung Galaxy S2. While I could see the potential in the OS, there were still some apps missing that I would require for a device to be my daily driver. One of the missing elements was an app to track the real-time information for the Luas. A quick web search for “Luas API” later and I stumbled upon Neil Cremins’ Luas PHP endpoint. The endpoint consists of a simple PHP script which, when called, returns inbound and outbound tram times for a specific stop in a meaningful JSON format:

aaron@zefram:~$ curl 'http://localhost/luas-api.php?action=times&station=BLA'

{"message":"All services operating normally",
"trams":[{"direction":"Inbound","dueMinutes":"2","destination":"Connolly"},{"direction":"Inbound","dueMinutes":"7","destination":"The Point"},{"direction":"Inbound","dueMinutes":"14","destination":"Connolly"},{"direction":"Inbound","dueMinutes":"18","destination":"The Point"},{"direction":"Outbound","dueMinutes":"1","destination":"Tallaght"},{"direction":"Outbound","dueMinutes":"5","destination":"Saggart"},{"direction":"Outbound","dueMinutes":"9","destination":"Tallaght"},{"direction":"Outbound","dueMinutes":"18","destination":"Saggart"}]}

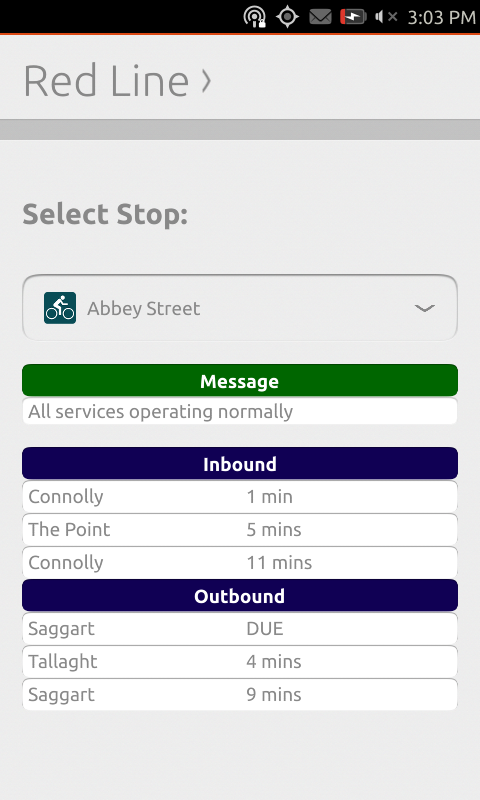
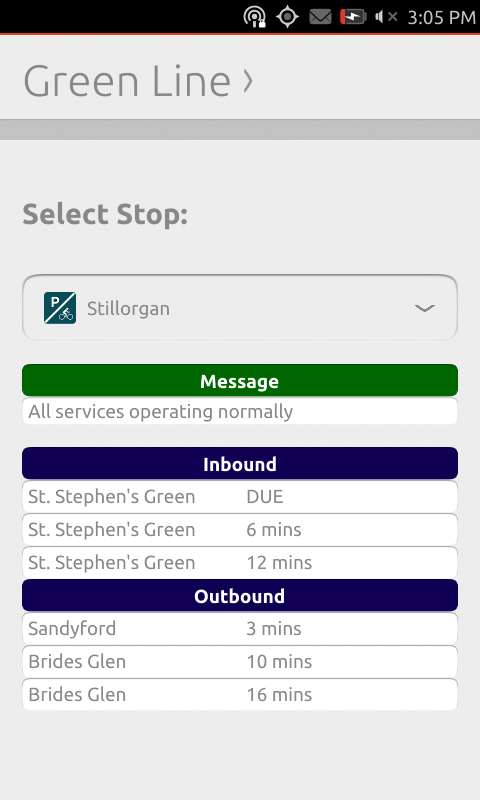
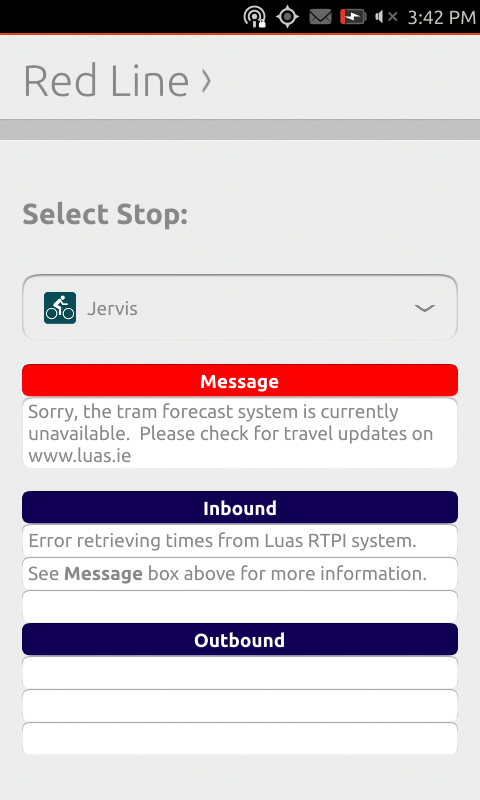
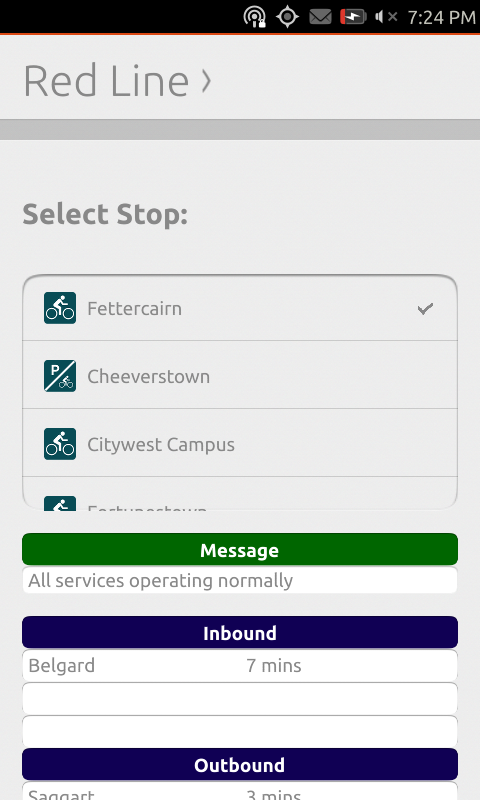
Armed with my data source and a server to host the PHP script on, I went to work on the actual application. I opted for an interface utilising Ubuntu’s Tabs class, with one tab each for the Luas Red and Green Lines. Choosing a stop is done with an unexpanded OptionSelector which, when tapped, expands to reveal a scrollable list of stops. I have a dedicated Message box which receives updates straight from the Luas API during a service disruption. I even made the box change colour from green to red when such an event occurs – I’m overly proud of that achievement. Finally a list of inbound and outbound trams for the selected stop is presented to the user, with expected times in minutes.

Red Line and Green Line tabs with typical displays:

  red_line_0.17green_line_0.17

Example of an RTPI outage, gracefully handled by uLuas. The Message comes straight from the Luas API:

rtpi_error

Expanded OptionSelector:

OptionSelector

The dedicated site for uLuas can be found at my development website:
http://uluas.thecosmicfrog.org

The source code for uLuas is released under the GNU General Public License and is available on my GitHub profile at the link below:
https://github.com/thecosmicfrog/uluas

uLuas icon kindly created and donated by Sam Hewitt.

Categories
Linux Ubuntu

Getting Ubuntu notifications to appear on the correct monitor

Like many of you, I use Ubuntu at work with a dual-monitor setup. One of the most frustrating things I’ve always found is its behavior regarding pop-up notifications. I regularly miss new emails or chat messages due to the notification popping up on my secondary monitor, right on my eye’s blind spot.

I’ve been putting up with this up until now, deeming it to be a bug in either Unity or notify-osd itself. I had always intended on filing a bug report, but I’m glad I never did; it turns out this is desired behavior. Fair enough, I suppose, but the fix I have found is far more correct behavior in my eyes (literally – heh…).

Rather than only displaying notifications on the connected monitor, entering the below command at the terminal will make it so that notifications appear on the active monitor, i.e. the monitor currently in use. Far more sensible, no?

gsettings set com.canonical.notify-osd multihead-mode focus-follow

If you’re new to Linux, or if entering odd-looking commands into text-based interfaces makes you uncomfortable, you can also apply the above fix graphically using the following steps:

  1. Open the Unity Dash (Windows/Super key).
  2. Search for and launch dconf Editor.
  3. On the left-hand menu, expand apps and click notify-osd.
  4. Next to the multihead-mode entry, double-click dont-focus-follow and change it to focus-follow.

And that’s it. Your Ubuntu notifications should now appear on the screen you are actually working on. Resetting it to the default behavior is as simple as adding back in the dont- before focus-follow.

Categories
Django Final Year Project Python

Django (not the movie)

For added ambience, listen to this song while reading.

django_logoDjango is a web framework. I only vaguely knew what that meant when I declared I was using it for my project. In a nutshell, it’s a way of plugging everything about a web application together in a coherent, structured way. That includes HTML, CSS, images, data stores and middleware. Anyone can write a CGI script in their favorite language that does nothing but spit out HTML to a browser, but that’s unnecessary with Django. In fact, Django won’t even let you embed any functional code within your HTML template. But we’ll get on to that later.

Django is an MVC web framework built on the Python programming language. MVC stands for Model – View – Controller, and is a massively important factor in the design of any Django web app. The Model represents the structure of the data used in the application. In most cases, your data will be stored in a typical relational database. The View typically defines what the user sees from an application and is often referred to as the front end or user interface. The Controller makes up the business logic of the application. It glues together the Model and View in a way that the View can both display data as stored in the Model and update the Model based on a user’s input.

Installing and getting started with Django is very straightforward. As I’m using a Debian-based Linux distribution for both development and deployment, installation is just one command:
apt-get install python-django

Creating a Django project is just another command:
django-admin startproject myproject

This creates the core files you need to get started with Django development. Each app has a manage.py file, as well as a directory named after your project. This project folder can be used to store HTML templates, as well as static content such as CSS files and images.

Anything that represents a key piece of functionality in a Django project is called an app. Apps are created with the manage.py script:
python manage.py startapp myapp

Each app is encapsulated in its own directory, inside of which are two important files: models.py and views.py. In these files, we define – yep, you guessed it – the models and views for the app.

In the second part of this post, I’ll explain what these files are in more detail, including what goes in to them to create a basic app.

Categories
Final Year Project

Final Year Project: Introduction

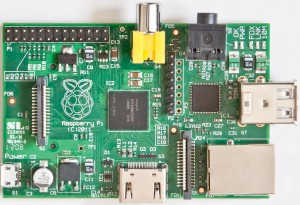
I have to admit that I wrote the Raspberry Pi off at first. I mean, my initial description of it as a “slow Linux computer” are technically correct, but I never really thought of looking at it for what it really is – a cheap, small and, least importantly, slow Linux computer.

Top-down view of Raspberry Pi

I’ve been actively using Linux since 2009, with Ubuntu eventually becoming my primary OS in early 2010.  I think it was the early descriptions of the Pi as a teaching tool for programming that put me off. I couldn’t comprehend why a low-spec, awkwardly-shaped computer would be desirable as a platform to teach the art of coding, particularly when most schools have perfectly capable machines already in their possession.

But then I got my hands on one. And, almost immediately, I realized that the Pi really is something special.

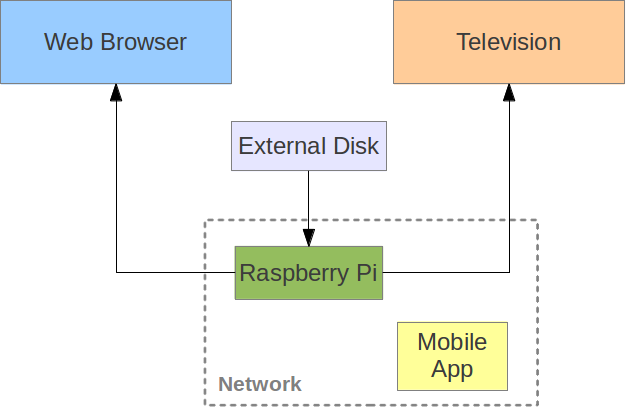
My Final Year Project is entitled Smartphone-controlled media streaming application for Raspberry Pi. The idea behind this project is to create an open source web-based software stack for the Pi which allows it to be used as both a media streaming server (to be accessed remotely via a browser) and as a TV-connected home media center, utilizing the Pi’s HDMI output capabilities. I aim to achieve this using web applications instead of native GTK+ or Qt interfaces. The benefit of this, besides portability, is a unified interface for both the remote streaming feature and the intention for the device to be used as a HTPC (Home Theater PC).

The niche of this project, and arguably the most challenging aspect of it, is the requirement for the application to be controlled by a smartphone. This can’t just involve writing an app that can access the same data store as the web application, but must be able to control the web interface as if it were a standard remote control for a set-top box or smart TV interface.

High-level architecture of project

I like Python. But, due to a combination of time constraints and how easily I’m distracted by shiny objects, I’ve written very little of it. Coupled with this, I’ve been intrigued by the Django framework for a while now. Partly due to its maturity and its wide community of developers, I’ve decided that it would be a good fit for the user-facing requirements of this project. The other part of my reasoning isn’t so much reasoning as it is curiosity. Other technologies I intend on using are: Nginx for the web server, PostgreSQL for the back-end data store, HTML, CSS and JavaScript for the web design and Java/SL4A for the mobile application, many of which I also have little experience with.

The way I figure it, what’s the point of engaging in a project if you’re not going to step outside your comfort zone so many times that the end goal appears to be a blurry vision of accomplishment, led to by a path made mostly of fire? And stack traces. Millions of them. And they’re also on fire.