Categories
Android

Updating to Android 5.1.0/5.1.1 on rooted Nexus 5

Updated (2015-05-29) – I have tested this method successfully with Android 5.1.1 and have updated the post title/content to reflect this.

Does this post look familiar?
I wrote a post back in December 2014 solving this same problem for Android 5.0.1, whereby a rooted Nexus device will not update via over-the-air (OTA). Rather than go over everything again, I’ll cut straight to the chase of how to update your rooted Nexus 5 to Android 5.1.0/5.1.1 via fastboot.

This guide presumes you’re using either Linux or Mac, with the appropriate Android tools (adb and fastboot) installed, although the Windows method should be much the same. For the purposes of this example, I’ll assume this is the Android 5.1.0/5.1.1 update for Nexus 5 (hammerhead-lmy47d), but the instructions should be similar for future releases.

Note: This will not wipe your device. However, it is always a good idea to back up, as things can always go wrong.

First, download the appropriate Android factory image from the Google Developers site. Uncompress the archive, as well as the archive contained within it, as below:

$> tar -zxf hammerhead-lmy48b-factory-596bb9c1.tgz
$> cd hammerhead-lmy48b
$> unzip image-hammerhead-lmy48b.zip

Next, make sure your device is in fastboot mode (hold VolUp, VolDown and Power button from a powered-off device). Verify your device can be picked up by running fastboot devices, then run the following commands:

$> fastboot flash radio radio-hammerhead-m8974a-2.0.50.2.26.img
$> fastboot reboot-bootloader
$> fastboot flash recovery recovery.img
   (above recovery step is optional - will overwrite custom recovery)
$> fastboot flash boot boot.img
$> fastboot flash system system.img

If all goes well, your device will be flashed with the latest version of Android.

Bonus – re-root your device: grab the appropriate version of CF-Auto-Root for your device, extract it and run the correct root script contained within. Your device will need to be in fastboot mode for this to work.

Credit to /u/laxor09 on Reddit for much of this information.
Categories
Android

Updating to Android 5.0.1 on rooted Nexus 5

OTA (over-the-air) updating in rooted Nexus land has never been the most elegant process. But, prior to Android 5.0 Lollipop, at least it worked as expected, with the main irk being that you’d need to re-root your device afterwards.

While trying to update to Android 5.0.1 on my rooted Nexus 5 via OTA today, I discovered that things are now even less clear-cut and that the update itself will now fail during the recovery phase. Thankfully, there’s a (relatively) pain-free way of getting around this, providing your comfortable with fastboot at the command line.

This guide presumes you’re using either Linux or Mac, with the appropriate Android tools (adb and fastboot) installed, although the Windows method should be much the same. For the purposes of this example, I’ll assume this is the Android 5.0.1 update for Nexus 5 (hammerhead-lrx22c), but the instructions should be similar for future releases.

Note: This will not wipe your device. However, it is always a good idea to back up, as things can always go wrong.

First, download the appropriate Android factory image from the Google Developers site. Uncompress the archive, as well as the archive contained within it, as below:

$> tar -zxf hammerhead-lrx22c-factory-0f9eda1b.tgz
$> cd hammerhead-lrx22c
$> unzip image-hammerhead-lrx22c.zip

Next, make sure your device is in fastboot mode (hold VolUp, VolDown and Power button from a powered-off device). Verify your device can be picked up by running fastboot devices, then run the following commands:

$> fastboot flash radio radio-hammerhead-m8974a-2.0.50.2.22.img
$> fastboot reboot-bootloader
$> fastboot flash recovery recovery.img
$> fastboot flash boot boot.img
$> fastboot flash system system.img

If all goes well, your device will be flashed with the latest version of Android.

Bonus – re-root your device: grab the appropriate version of CF-Auto-Root for your device, extract it and run the correct root script contained within. Your device will need to be in fastboot mode for this to work.

Credit to /u/laxor09 on Reddit for much of this information.
Categories
Final Year Project

Final Year Project: Introduction

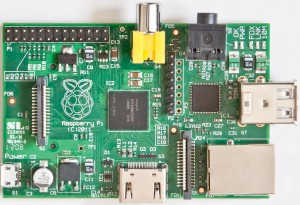
I have to admit that I wrote the Raspberry Pi off at first. I mean, my initial description of it as a “slow Linux computer” are technically correct, but I never really thought of looking at it for what it really is – a cheap, small and, least importantly, slow Linux computer.

Top-down view of Raspberry Pi

I’ve been actively using Linux since 2009, with Ubuntu eventually becoming my primary OS in early 2010.  I think it was the early descriptions of the Pi as a teaching tool for programming that put me off. I couldn’t comprehend why a low-spec, awkwardly-shaped computer would be desirable as a platform to teach the art of coding, particularly when most schools have perfectly capable machines already in their possession.

But then I got my hands on one. And, almost immediately, I realized that the Pi really is something special.

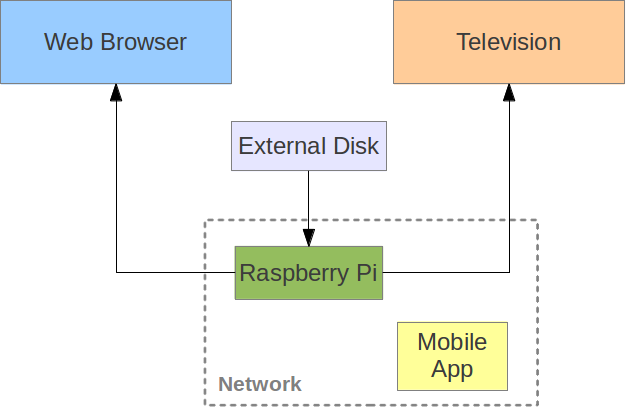
My Final Year Project is entitled Smartphone-controlled media streaming application for Raspberry Pi. The idea behind this project is to create an open source web-based software stack for the Pi which allows it to be used as both a media streaming server (to be accessed remotely via a browser) and as a TV-connected home media center, utilizing the Pi’s HDMI output capabilities. I aim to achieve this using web applications instead of native GTK+ or Qt interfaces. The benefit of this, besides portability, is a unified interface for both the remote streaming feature and the intention for the device to be used as a HTPC (Home Theater PC).

The niche of this project, and arguably the most challenging aspect of it, is the requirement for the application to be controlled by a smartphone. This can’t just involve writing an app that can access the same data store as the web application, but must be able to control the web interface as if it were a standard remote control for a set-top box or smart TV interface.

High-level architecture of project

I like Python. But, due to a combination of time constraints and how easily I’m distracted by shiny objects, I’ve written very little of it. Coupled with this, I’ve been intrigued by the Django framework for a while now. Partly due to its maturity and its wide community of developers, I’ve decided that it would be a good fit for the user-facing requirements of this project. The other part of my reasoning isn’t so much reasoning as it is curiosity. Other technologies I intend on using are: Nginx for the web server, PostgreSQL for the back-end data store, HTML, CSS and JavaScript for the web design and Java/SL4A for the mobile application, many of which I also have little experience with.

The way I figure it, what’s the point of engaging in a project if you’re not going to step outside your comfort zone so many times that the end goal appears to be a blurry vision of accomplishment, led to by a path made mostly of fire? And stack traces. Millions of them. And they’re also on fire.